Showing posts with label Covering Knot. Show all posts
Tuesday, November 13, 2012
Floating Fender Style Key Fob
My most recent boat purchase came with a floating key chain which I decided to dress up with some knot work. The polypropylene cord for this project also floats and should therefore not be a detrimental addition the the fob. The bottom covering is an 8 strand covering knot which is shown in the Ashley Book of Knots. This is a "boxed end" knot which wraps the bottom of the fob. I used this knot previously in a glass jar covering post and also in my umbrella hand covering post. An excerpt from the Ashley Book of Knots showing how to tie this is included in the jar covering post. I then added a straight whip to the middle of the knot, and finally a 5 lead by 4 bight turks head to the top.
Sunday, February 26, 2012
Glass Jar Covering and Tudor Rose Plug
This is a project that I have been fiddling with on and off for quite some time. It started with a caper jar we had for a recipe. I washed it best I could and soaked off the labels. The jar is covered with an 8 strand covering knot from the Ashley Book of Knots (ABOK 2224, see reference from Google Books below). The cord that I used for this knot is "bait line" that I purchase from Hamilton Marine. This cord is really stiff. I often use this cord when I am trying something new and I really want something that stays put when I working with it. The drawback with this cord is that it is so stiff that it has some spring to it which can make it hard to tighten and it sometimes leaves undesired gaps in knots.
To close the jar I tied a plug. The decorative knot for the plug is called a "Tudor Rose Knot" that I tied with instructions from a tutorial I found on Knot Heads World Wide. The knot for my plug has 6 strands where the tutorial only uses 5. There were a few head-scratching moments getting through the tutorial, but overall it was fairly easy to follow. Because of the stiff cord I didn't get a very good "twill" from the Matthew Walker Knot that was tied around the edges. After tying the Tudor Rose knot I crowned the remaining lines around the standing ends and tied a 6 lead by 5 bight turks head around the crowning to make the plug. It fits nice a snug in the jar. Frayed Knot arts has a very nice tutorial for tying a star knot plug which is similar and an excellent reference.
Tuesday, August 9, 2011
Tiller Extension 4 Bight Turks Head
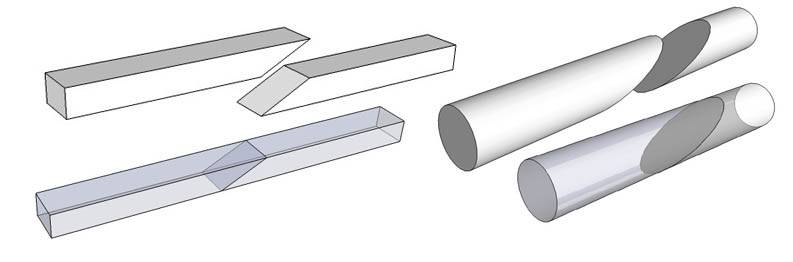
This is the tiller extension/hiking stick from our sail boat. The other week it was accidentially stepped upon and the end was broken off. To fix it I bevel sanded the remaining pieces and epoxied them back together with a scarf joint. Scarf joints are fairly common in wooden boat construction and when made with epoxy the joint itself is stronger than then surrounding wood. I wasn't crazy about aesthetics of the final joint so I decided to put a covering turks head over the joint. If my count is correct this is a 25 lead by 4 bight turks head. It was tied as a running turks head which means it was all one piece of line. If you are interested in tying long running turks heads, I would suggest looking at "Introduction to Turks Heads" by Tom Hall which you can find at KHWW as an E book. Stormdrane also has an excellent video for a two bight turks head which can be found here. The 4 bight turks head for this project was enlarged from a 2 bight turks head.
Tuesday, May 24, 2011
Globe Turks Head Book Marker
This is a book page marker that I tied. The knots are 5 lead by 4 bight turks heads into which I inserted a 20 millimeter wooden bead. Since there are only 4 bights at the end of the turks head, when tightened around a round core the end closes to create a round knot. Three and four bight turks heads can be adapted in this manner as a covering knot for many shapes. After doubling and getting the knot relatively snug with the blue chord, I ran the black chord through. Getting an appropriately sized round core is important for this knot. And of course, you have to tie the knot twice at each end of the book marker. I am currently reading the expanded version of Stephen King's "The Stand".
I hope that this book mark will be more reliable than that little scrap of paper that I kept losing.
Tuesday, May 17, 2011
Umbrella Handle Tying Process Photo
I found this photograph that I took of my umbrella handle project that I thought folks might find interesting. To get to this point in the process I first taped the extreme ends of the handle with one row of adhesive tape to keep things from slipping. Then I tied six strands around the handle at the tip of the umbrella and spiraled them around until I got to the other end and made the second constrictor. Then the end covering was made and the lines were feed through opposite the spiral. All six strands were worked thorough, which is about where this photo was taken. The strands were then walled and feed back through to double the knot. My advice on this tie would be to take ones time and fair the knot as you go. Also, you want it to be snug, but not necessarily tight. If you make the knot too tight it gets very difficult to snug down the subsequent passes. The other trick in this case was to keep the knot "open" on the outside of the cane shape and closed on the "inside" of the cane. On top of that the end sections had to be closed enough that the tape did not show.
Sunday, March 27, 2011
Umbrella Handle

This is a cane shaped umbrella handle that I covered using a method directly from the "The Monkey's Fist and other Knot Coverings" chapter of the Ashley Book of knots. To do this knot, I took six strands and wrapped them in a helix around the handle, lashing the strands to the handle at the knot ends. Then using the pattern from Ashley, I created the basic knot to create the end covering. From there the turks head pattern is created by weaving through the helix with the stands. This method is also covered in the "Turks Head" section of Ashley. At the base of the umbrella the strands are walled and brought back through to create a second pass on the knot. Because of the corner on the cane shape, the crosses are closed on the inside of the curve and open on the outside of the curve. All twelve strands were cut and tucked to finish the knot.
Subscribe to:
Posts (Atom)